Thursday 21 April 2011

Capsicum and Fetta Scrolls

Tasty Capsicum, Fetta & Cashew Scrolls
I had a delicious capsicum dip in the fridge that needed to be used up before it went out of date in about 5 days. On it's own it will not be eaten, so I decided to try to make some tasty scrolls with it.

The recipe for the dough, is the recipe that came with the bread machine for the basic white loaf. This is super easy, and soooo delicious they should be illegal!!!!
Please note that all measurements are metric.

Ingredients
Dough
1 ¼ cups of water
2 Tbs oil (I used rice bran has it has no flavour)
2 ½ Tbs milk powder
2 tsp salt
3 ½ Tbs sugar
4 cups plain flour
1 Tbs dry yeast
Filling
1 tub Wattle Valley Capsicum & Fetta dip with Cashews

Method
  1. Place all the dough ingredients into your bread machine, in the order listed.
  2. Set your machine to the dough program. Mine takes 1½ hours to complete.
  3. Pre-heat your oven to 180ยบ Celcius
  4. Roll out the dough in a large rectangle shape. The dough should be about 1cm in thickness.
  5. Spread the dip over the dough, making sure you leave a 2cm band along one edge without any dip.
  6. Roll the dough from edge towards the edge that has the dip free band. (in the direction of the blue arrow as shown above).
  7. Cut 2cm rolls with a very sharp knife making sure you don't press the dough as you're doing it, you want to make sure your scrolls are nice and round and not squashed by your knife.
  8. Set the scrolls about 4 cms apart on a cookie sheet covered with non stick baking paper.
  9. Set aside in a warm place for 30 minutes to rise.
  10. Brush with an egg wash and bake in a hot oven for 15 minutes or until nice and golden, make sure that they don't burn or overcook or they will be too dry and crusty.

My first adventure into Macaron land


After seeing many people posting pictures of their beautiful macarons, and after having almond meal sitting in my pantry for what seemed like forever, I finally decided to try one of the many recipes I had saved over the past few months.

I think I really hit the jackpot with this recipe, as the macarons turned out pretty well for a first try.

I would say that I would change absolutely nothing in the recipe, I followed it pretty much to the letter, and voila!! Success!!!

I will certainly be trying more of Ms Taste's macaron recipes in the future.

Here is the recipe.

Just a few notes on my experience with this recipe.
  1. I didn't age my egg whites for as long as recommended. I put mine in my pantry on Sunday night and used them on Wednesday afternoon. The amount of time seemed to do the trick. Some other recipes suggest aging for one night only, however I held off as long as I could ;)
  2. My mix did not fall in ribbons. I mixed it for the recommended 30-40 turns, and didn't want to go further as I didn't want to over mix, however my mix was quite firm.
  3. I ended up leaving them to crust for around 40-45 minutes, this is because I just couldn't get back to them whilst feeding the baby :)
  4. My macarons did not spread at all, so in expectation of them spreading I piped them quite small, as a result, one full macaron easily fits whole in your mouth, and melts away before you've had a chance to realise what is happening. IT'S DANGEROUS!!!! They can all dissapear before you know it ;) Pipe them a little bigger if your mix turns out to be firm ;)
  5. I used a different filling, recipe below.
White Chocolate Almond Ganache
40gms Pura Thick Cream (I use Pura because they use vegetable gums as a thickener instead of gelatine)
110gms Lindt Swiss Gold White with Almonds
  1. Chop the chocolate finely. Make sure you do this or else the ganache won't go through your piping bag, the chocolate has whole almonds in it, you want to make sure that those are chopped well.
  2. Heat up your cream in a small bowl in the microwave for about 25 seconds. I recommend the microwave because the amount is so small.
  3. Add chopped chocolate to the hot cream and mix to form a thick paste, if it's runny, allow it to cool completely before placing it in a piping bag with a large round tip (I used Wilton No. 12)
  4. Pipe a little of the ganache onto one macaron piece, and stick it together with another.
  5. Try not to eat them all in one sitting ;)

Tuesday 19 April 2011

Corazanes Dulces

Corazanes Dulces, translates to "Sweet Croissants". However these little yummy morsels, are not a lot like croissants, except for their shape. These "croissants" are a lot more bready in texture. In Uruguay these are a part of a group of sweets we call "Bizcochos" and we usually eat them for afternoon tea with a nice "mate".

This is what bizcochos look like.
http://cocinerama.com/wp-content/uploads/2008/09/bizcochos.jpg

I have never tried to make these before, but for some reason, a couple of weeks ago, I went in search of a recipe. They are normally made using lard, from beef or pork, but being vegetarian, I had to vary the recipe to use a non animal fat.

Follow this link for the recipe that I used. The recipe is in Spanish, but the ingredients for the original are as follows:

Dough
500 grams plain flour
30 grams fresh yeast
30 grams sugar
30 grams salt
150 grams lard (pork or beef, at room temperature)
200 mls warm water

Paste
70gms lard
100gms plain flour

I thought that 30grams of salt was far too much, and reduced the amount to 10gms. Also when I went to start, I realised that I didn't have enough plain flour, so I used a combination of spelt and plain flour. Also, I found that the "PASTE" which is meant to be made with the 70gms of lard and 100gms of plain flour, turned out like a dough, I guess it must be because the fat that I used had a high content of water, and therefore didn't perform like the lard. Still, I got some good results :)

I also varied the recipe by using a bread maker instead of doing it all by hand. It works well this way when you have a 3 month old baby at home ;)

These are the ingredients for the ones that I made.
Dough


250gms plain organic flour
250gms organic spelt flour (white)
150gms butterfully light (it's a butter/oil spread from Aldi, I didn't realise it was low fat till later)
2tsp dry yeast
30gms sugar
10gms salt
200mls warm water

Paste
70gms melted butterfully
100gms spelt flour
In addition to this I also used 2 tbs of butterfully and 2tbs of spelt flour.

Method
  1. Place all the dough ingredients in the bowl of your bread maker and turn on to the dough setting.
  2. Once the dough is complete, let it rest in the breadmaker bowl until it increases in size enough to pretty much fill the bowl, same way as your loaf of bread would. I only did this because having a baby, I didn't get back to it for quite a long time after the dough was complete ;)
  3. Take out the dough and place on a floured bench. Roll out in a rectangle shape, your dough should be about a 1/2 cm in thickness.
  4. Roll out the paste, in fact the paste should be able to be spread onto your dough, but because of what I explained earlier, mine didn't work out ;), so you roll it out really really thinly and spread it out over your dough, trying to cover as much of your dough as possible. Because my "paste" didn't cover the whole of my dough, I used the 2tbs of butter and make up for it. Melt the 2tbs of butter and brush it over the dough and paste, and sprinkle with the flour.
  5. Roll up the dough the same way you would roll up a swiss roll. Then put it aside in a warm place to rise for half an hour.
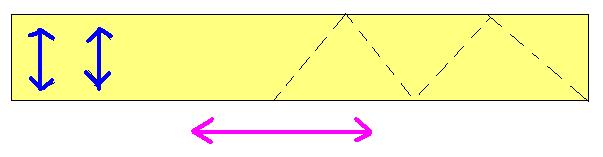
  6. First roll out the pastry roll in the direction of the blue arrows. Cut the pastry in half , and roll out in the direction of the pink arrow. Cut pieces as indicated by the dotted line, and roll up your "croissants" starting from the widest part of the triangle, towards the point.
  7. Place them on a cookie sheet covered with baking paper and allow to rise in a warm place for about 15 minutes. Brush with a simple syrup and sprinkle with sugar. Bake for about 15 minutes until they're nice and golden.
  8. Enjoy with a cuppa :)
NOTE: These turned out great and they're delicious, however they are nothing like the "Corazanes" you can buy in Uruguay in a bakery. I will try making these again, and if they're better I will post the recipe.