Monday, 8 August 2011

Chocolate Fondants - The good, the bad and the UGLY!!

After being told that chocolate fondants are so easy, and yadda yadda yadda, I decided to find a recipe online and give them a go.

On Saturday night, my mum and dad were coming over for dinner. I thought they'd be the perfect guinea pigs to try these out on. Dinner was Vegetarian Thai Green Curry (for mum, Boone and I), and coconut prawns (for Dad and Boone).

I found this recipe by Gordon Ramsay, which had fabulous reviews, and decided to give it a go.
http://www.bbcgoodfood.com/recipes/8168/chocolate-fondant

However, I am known for having the inability to follow recipes and since my printer was not working, I just took down the ingredients and trusted myself to remember the method. (I have an almost 7 month old baby, I remember NOTHING!!!)

Soo here is what I ended up doing.

The recipe calls for 4 eggs and 4 egg yolks. I hate separating eggs, and wastage. So if I am not going to be making something else with the whites, then I always try to use recipes that call for full eggs. So instead of using 4 eggs and 4 yolks, I just put in 6 whole eggs ;)
I also had no dark chocolate, so I used milk chocolate, and added two tablespoons of my homemade vanilla extract which is made with vanilla beans and vodka. This made the fondants quite boozy!!! HIC!!!

Anyway, here is the recipe I ended up using with all my variations.

Ingredients

50g melted butter for brushing dariole molds
organic cocoa powder for dusting dariole molds
200g milk chocolate
200g organic butter
200g brown sugar
6 eggs
200g plain flour

  1. Brush dariole molds with melted butter, and place upside down on a plate. My mix made 7 fondants. Place plate in the freezer for about 10 minutes. Take the dariole molds out, then brush with the remainder of the butter, place back in the freezer for a few minutes, then dust with cocoa, ensuring you cover all the sides and bottom of the ramekin. Tap out any excess cocoa.
  2. Place butter, sugar and chocolate in a microwave safe bowl, and heat for two minutes on medium. (If you put it on high, you could burn your chocolate). Stir butter/chocolate/sugar mix, and heat for another minute, until mixture is all melted. Keep heating in one minute increments. Once it is all melted and combined, set aside to cool for 10 minutes.
  3. Add eggs one at a time to the chocolate mixture, until thoroughly combined.
  4. Sift flower into wet mix, and mix completely.
  5. Spoon mix evenly into your dariole molds.
  6. Place dariole molds on a plate, cover with glad (saran) wrap and freeze.
  7. When you're ready to cook these, preheat your oven to 200 degrees Celsius in a fan forced oven. 
  8. Bake for 15 minutes, then take out of the oven, and allow them to sit/cool for a further 10 minutes. (The recommended minute (given by the original recipe) meant
    THE UGLY
    that I ended up with some disasters, and only the very last fondant that I unmoulded, came out perfectly. This meant that because I served myself last, I ended up with the perfect fondant, and my guests, had puddles of muck like the one below, and I got comments that I was keeping the best for myself (LOL). I have since made a few more fondants, and found that the 10 minute wait time, is perfect, as they all come out easily, without breaking, but you have to be very gentle all the same.


    Run a knife around the edge of the ramekin to ensure the fondant is not going to get stuck. Turn over onto a plate, and serve with creme fraiche/yogurt/cream/icecream.

So the verdict?? well they are super easy, just gotta know what you're doing!!! According to the recipe by Gordon Ramsey, these can be frozen for up to a month. Makes desserts at dinner parties sooooo much easier :)

Thursday, 21 April 2011

Capsicum and Fetta Scrolls

Tasty Capsicum, Fetta & Cashew Scrolls
I had a delicious capsicum dip in the fridge that needed to be used up before it went out of date in about 5 days. On it's own it will not be eaten, so I decided to try to make some tasty scrolls with it.

The recipe for the dough, is the recipe that came with the bread machine for the basic white loaf. This is super easy, and soooo delicious they should be illegal!!!!
Please note that all measurements are metric.

Ingredients
Dough
1 ¼ cups of water
2 Tbs oil (I used rice bran has it has no flavour)
2 ½ Tbs milk powder
2 tsp salt
3 ½ Tbs sugar
4 cups plain flour
1 Tbs dry yeast
Filling
1 tub Wattle Valley Capsicum & Fetta dip with Cashews

Method
  1. Place all the dough ingredients into your bread machine, in the order listed.
  2. Set your machine to the dough program. Mine takes 1½ hours to complete.
  3. Pre-heat your oven to 180ยบ Celcius
  4. Roll out the dough in a large rectangle shape. The dough should be about 1cm in thickness.
  5. Spread the dip over the dough, making sure you leave a 2cm band along one edge without any dip.
  6. Roll the dough from edge towards the edge that has the dip free band. (in the direction of the blue arrow as shown above).
  7. Cut 2cm rolls with a very sharp knife making sure you don't press the dough as you're doing it, you want to make sure your scrolls are nice and round and not squashed by your knife.
  8. Set the scrolls about 4 cms apart on a cookie sheet covered with non stick baking paper.
  9. Set aside in a warm place for 30 minutes to rise.
  10. Brush with an egg wash and bake in a hot oven for 15 minutes or until nice and golden, make sure that they don't burn or overcook or they will be too dry and crusty.

My first adventure into Macaron land


After seeing many people posting pictures of their beautiful macarons, and after having almond meal sitting in my pantry for what seemed like forever, I finally decided to try one of the many recipes I had saved over the past few months.

I think I really hit the jackpot with this recipe, as the macarons turned out pretty well for a first try.

I would say that I would change absolutely nothing in the recipe, I followed it pretty much to the letter, and voila!! Success!!!

I will certainly be trying more of Ms Taste's macaron recipes in the future.

Here is the recipe.

Just a few notes on my experience with this recipe.
  1. I didn't age my egg whites for as long as recommended. I put mine in my pantry on Sunday night and used them on Wednesday afternoon. The amount of time seemed to do the trick. Some other recipes suggest aging for one night only, however I held off as long as I could ;)
  2. My mix did not fall in ribbons. I mixed it for the recommended 30-40 turns, and didn't want to go further as I didn't want to over mix, however my mix was quite firm.
  3. I ended up leaving them to crust for around 40-45 minutes, this is because I just couldn't get back to them whilst feeding the baby :)
  4. My macarons did not spread at all, so in expectation of them spreading I piped them quite small, as a result, one full macaron easily fits whole in your mouth, and melts away before you've had a chance to realise what is happening. IT'S DANGEROUS!!!! They can all dissapear before you know it ;) Pipe them a little bigger if your mix turns out to be firm ;)
  5. I used a different filling, recipe below.
White Chocolate Almond Ganache
40gms Pura Thick Cream (I use Pura because they use vegetable gums as a thickener instead of gelatine)
110gms Lindt Swiss Gold White with Almonds
  1. Chop the chocolate finely. Make sure you do this or else the ganache won't go through your piping bag, the chocolate has whole almonds in it, you want to make sure that those are chopped well.
  2. Heat up your cream in a small bowl in the microwave for about 25 seconds. I recommend the microwave because the amount is so small.
  3. Add chopped chocolate to the hot cream and mix to form a thick paste, if it's runny, allow it to cool completely before placing it in a piping bag with a large round tip (I used Wilton No. 12)
  4. Pipe a little of the ganache onto one macaron piece, and stick it together with another.
  5. Try not to eat them all in one sitting ;)

Tuesday, 19 April 2011

Corazanes Dulces

Corazanes Dulces, translates to "Sweet Croissants". However these little yummy morsels, are not a lot like croissants, except for their shape. These "croissants" are a lot more bready in texture. In Uruguay these are a part of a group of sweets we call "Bizcochos" and we usually eat them for afternoon tea with a nice "mate".

This is what bizcochos look like.
http://cocinerama.com/wp-content/uploads/2008/09/bizcochos.jpg

I have never tried to make these before, but for some reason, a couple of weeks ago, I went in search of a recipe. They are normally made using lard, from beef or pork, but being vegetarian, I had to vary the recipe to use a non animal fat.

Follow this link for the recipe that I used. The recipe is in Spanish, but the ingredients for the original are as follows:

Dough
500 grams plain flour
30 grams fresh yeast
30 grams sugar
30 grams salt
150 grams lard (pork or beef, at room temperature)
200 mls warm water

Paste
70gms lard
100gms plain flour

I thought that 30grams of salt was far too much, and reduced the amount to 10gms. Also when I went to start, I realised that I didn't have enough plain flour, so I used a combination of spelt and plain flour. Also, I found that the "PASTE" which is meant to be made with the 70gms of lard and 100gms of plain flour, turned out like a dough, I guess it must be because the fat that I used had a high content of water, and therefore didn't perform like the lard. Still, I got some good results :)

I also varied the recipe by using a bread maker instead of doing it all by hand. It works well this way when you have a 3 month old baby at home ;)

These are the ingredients for the ones that I made.
Dough


250gms plain organic flour
250gms organic spelt flour (white)
150gms butterfully light (it's a butter/oil spread from Aldi, I didn't realise it was low fat till later)
2tsp dry yeast
30gms sugar
10gms salt
200mls warm water

Paste
70gms melted butterfully
100gms spelt flour
In addition to this I also used 2 tbs of butterfully and 2tbs of spelt flour.

Method
  1. Place all the dough ingredients in the bowl of your bread maker and turn on to the dough setting.
  2. Once the dough is complete, let it rest in the breadmaker bowl until it increases in size enough to pretty much fill the bowl, same way as your loaf of bread would. I only did this because having a baby, I didn't get back to it for quite a long time after the dough was complete ;)
  3. Take out the dough and place on a floured bench. Roll out in a rectangle shape, your dough should be about a 1/2 cm in thickness.
  4. Roll out the paste, in fact the paste should be able to be spread onto your dough, but because of what I explained earlier, mine didn't work out ;), so you roll it out really really thinly and spread it out over your dough, trying to cover as much of your dough as possible. Because my "paste" didn't cover the whole of my dough, I used the 2tbs of butter and make up for it. Melt the 2tbs of butter and brush it over the dough and paste, and sprinkle with the flour.
  5. Roll up the dough the same way you would roll up a swiss roll. Then put it aside in a warm place to rise for half an hour.
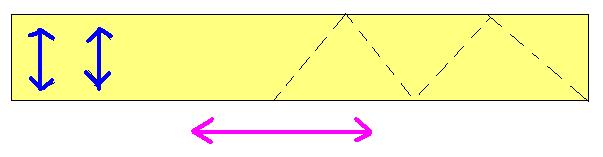
  6. First roll out the pastry roll in the direction of the blue arrows. Cut the pastry in half , and roll out in the direction of the pink arrow. Cut pieces as indicated by the dotted line, and roll up your "croissants" starting from the widest part of the triangle, towards the point.
  7. Place them on a cookie sheet covered with baking paper and allow to rise in a warm place for about 15 minutes. Brush with a simple syrup and sprinkle with sugar. Bake for about 15 minutes until they're nice and golden.
  8. Enjoy with a cuppa :)
NOTE: These turned out great and they're delicious, however they are nothing like the "Corazanes" you can buy in Uruguay in a bakery. I will try making these again, and if they're better I will post the recipe.

    Thursday, 31 March 2011

    Mini muffin anyone??


    I have been trying to get some baking done for a few weeks now, but with a 2 and a half month on my hip, the spare time I have is very little. Today however, Ms Lani decided to take a few naps, and the recipe I tried out is very quick.

    For a few days now, I have wanted to make a yogurt muffin. I found a chocolate recipe online which I decided to convert to a more healthy version.

    I replaced the flour with spelt flour, the butter with coconut oil, the milk with soy and the sugar with agave nectar/syrup. This meant altering the amounts, and for a first go, I think they turned out pretty good.

    This recipe makes 48 mini muffins. They're very moist and not too sweet, so if you prefer a sweeter muffin, you may want to add more agave or reduce the amount of cocoa used. Please keep in mind that if you add more agave you will have to reduce one of the other wet ingredients.

    For these I also used mainly organic ingredients.

    Ingredients
    220gms Wholemeal Spelt Flour
    15gms gluten free baking powder
    200gms agave nectar
    30gms cocoa
    100gms coconut oil
    1 large egg
    230gms full fat yogurt (at room temperature)
    1/4 cup soy milk
    90gms chopped chocolate (I used dark Lindt)

    Method

    1. Preheat your oven to 200 degrees celcius.
    2. Oil or spray with cooking oil two mini muffin pans. This mix makes 48, so I used two 24 pans.
    3. Sift together the flour, baking powder and cocoa until well combined. Add the chopped chocolate.
    4. Melt the coconut oil with the agave nectar and soy milk. Do not boil, you want these to be just warm not hot.
    5. Mix in the egg and yogurt. These have to be at room temperature because if they are straight out from the fridge they can solidify parts of the coconut oil and you will end up with lumps.
    6. Add the wet ingredients to the dry and mix in with a flat knife or spatula. Do not beat, you just want the ingredients to be just combined and no dry mix to be left over.
    7. Spoon into pan and bake for 10-12 minutes until done.
    8. Allow to cool and eat with a nice cuppa :)


      Enjoy!!!

    Sunday, 22 August 2010

    Zucchini Tomato & Ricotta Galette

    I have been thinking about making one of these delicious pastries since I saw the photo of a galette by Smitten Kitchen last week. Unfortunately work has been crazy busy, and I only just got to try it out tonight. It is amazingly delicious!!!
    The pastry is flaky and the sour cream gives it such a wonderful taste.

    Anyway here is my version of a galette adapted from Meals at Home


    Base:
    220gms Plain flour
    120gms chilled salted butter
    65gms sour cream
    40gms fresh lemon juice
    67gms chilled water

    Filling:
    1 large zucchini sliced into 1/2cm rounds
    2 Roma tomatoes sliced into 1/2 cm rounds
    250gms ricotta cheese
    40gms grated Parmesan cheese
    60gms grated tasty cheese
    2 large eggs
    1 bunch of basil chopped
    1 tbs chopped thyme
    1 shallot minced
    Salt and Pepper to taste

    Method
    1. Place flour, butter, and sour cream in the food processor and process until it resembles coarse crumbs.
    2. Place flour mix in a bowl, pour water, and lemon juice and stir with a wooden spoon.
    3. Knead lightly on a floured surface, once it comes together wrap in glad wrap and place in the fridge to rest.
    4. Preheat oven to 200 degree Celsius.
    5. Spread the tomato and zucchini slices over paper towels. This will drain the juice that will come out of them. Pat the tops with paper towel.
    6. Mix cheeses with thyme, basil, shallot and egg. Season mix with a little salt and pepper if desired. Keep in mind that two of the cheeses already have some salt in them.
    7. Take pastry out of the fridge and roll it out to a large circle (approx 14 inches)
    8. Place on a flat baking tray lined with baking paper.
    9. Place cheese mix in the middle of the pastry, and spread out evenly leaving a 4cm edge.
    10. Start placing the tomato and zucchini on top of the cheese, each slice only slightly overlapping. Sprinkle with freshly cracked salt and pepper.
    11. Fold the leftover edge of pastry over the cheese zucchini tomato, just to make an edge that will hold in the filling. Make sure that you press this edge onto itself, I found mine was just about to let the fillings spill out.
    12. Bake for 30-40 minutes or until the egg/cheese is set.
    13. Serve warm with steamed vegetables.

    Sunday, 15 August 2010

    Raspberry Swirl Cheesecake - Gluten Free

    This recipe was adapted from a recipe published in the Master Chef magazine. I just found the recipe online, and it turns out that the recipe originally came from the Lindt website. Anyhoo, here's the original recipe and my version :D


    Base
    200g gluten free shortbread biscuits
    50g Dessicated Coconut
    100g cream cheese


    For the cheesecake
    500g cream cheese
    150g sour cream
    120g sugar
    1 lemon, zest only
    2 eggs
    1 egg yolk
    2 tbsp corn flour
    150g Fresh or frozen raspberries

    BASE
    1. Grease and line a 20cm square pan.
    2. Place biscuits in the food processor and process until you get a fine crumb.
    3. Add cream cheese, and coconut, and process until thoroughly combined.
    4. Press mix into the pan, and place in the fridge until the rest of the cake is ready.
    CHEESECAKE
    1. Place cream cheese and sour cream in food processor. Process until smooth.
    2. Add egg, cornflour, sugar, and lemon rind. Process thoroughly.
    3. Remove about half of the mix from the food processor and set aside.
    4. Add 50 gms of the raspberries and process thoroughly.
    5. Pour the raspberry cheesecake mix into the pre-prepared pan, then pour the one without raspberry over it. Using a skewer, make a swirl pattern.
    6. Decorate the top of the cheesecake with the leftover raspberries.
    7. Bake in a water bath at 150 degrees Celsius for an hour and 10 minutes.
    8. Chill before serving.

    Sunday, 25 July 2010

    Pasteles Hojaldrados, made for my dad who loves them

    My grandmother used to make these for my dad's birthday when we lived in Uruguay. After we came to Australia, my aunty (dad's sister) made them a few times and then mum and dad got into the habit of making them for pretty much every birthday. But for many many years, no one has made these. I think it's simply because they take such a long time. (As I had suspected and discovered today)

    I got bitten by the cooking bug once again, and went on a search for a recipe for these. I have never made them before, so this was a total experiment.

    I found this recipe by a Uruguayan guy, which I've adapted for vegetarians. The original recipe is made with lard (beef lard) eeek!!! Still they're yum :D

    http://gcastrop.blogspot.com/2008/08/receta-del-mes-pasteles-hojaldrados-de.html
    The recipe goes like this

    Ingredients
    500gms of plain flour
    250mls of hot water
    80gms of butter
    1 tbs of salt (I use rock salt, and thought it was too much but did it anyway, cause that's what the recipe said, the pastry was quite salty, but it works in the end, go figure!!!)
    1tsp of sugar
    Dulce de leche or Quince paste (Or both if you want to try making half and half)
    120gms of cornflour
    60gms of butter (softened)
    1 litre of Rice Bran oil
    Caster sugar for sprinkling the pasteles :)

    Method
    1. In a small bowl, mix the hot water, sugar, salt and 80gms of butter. Mix until melted and combined.
    2. Place flour in a bowl, make a well in the center and pour the contents from above in, to make a soft dough.
    3. Knead the dough until it is pliable.
    4. Roll out the dough into a rectangle, 5mm in thickness.
    5. Spread about 1/6th of the butter (60gms) over half of the rolled out pastry, sprinkle with corn flour, and fold the unbuttered piece over the buttered piece, press together lightly and roll out into a rectangle again. Repeat at least 6 times. (I did mine 7 times)
    6. Cover the pastry with glad wrap and set aside to rest for 40 minutes.
    7. Roll out the pastry to about 3mm in thickness, and cut into 8cm squares.
    8. Place some quince paste in the middle of each square, moisten the area just around the filling, and press the pastry together, making sure that you don't seal the edges, you just want to seal the pastry around the filling.
    9. If you're filling with two different fillings, i would recommend, as i did, that you fold them differently so you know which ones are which. :D
    10. Fry in hot rice bran oil, making sure that you turn them over, the tend to cook well where the filling weighs them down, so you need to push them into the oil so all sides are cooked well.
    11. Drain in kitchen paper, and sprinkle with caster sugar.
    12. Do not throw out the cut offs, cut them into strips, fry them and sprinkle with caster sugar, they make a beautiful crunchy snack.
    13. Best eaten cold with a nice hot chocolate. BEWARE YOUR HEART!!!! hahahahahaha

    Tuesday, 20 July 2010

    Sweet Potato Pie - Yeah it's looking like pie week!!!


    This pie was inspired by a pumpkin pie recipe I saw last week on Better Home and Gardens and a roasted sweet potato that a work colleague makes.

    The pumpkin pie on the telly was made with skim milk, and low fat pastry. None of that here ;)

    The roasted sweet potato is mashed with five spice and a strong tasting cheese. Hmmmm yum!!!

    I kind of combined these two ideas to make this pie.
    Once again, I used the puff pastry from Aldi.


    Ingredients

    600gms boiled sweet potato
    50gms grated Parmesan
    1 quarter (to half) of a freshly grated nutmeg
    1 sheet of puff pastry
    3 eggs
    Salt & Pepper to taste

    Method
    1. Pre heat oven to 180 degrees Celsius.
    2. Line a gratin dish with baking paper on the bottom and grease the sides.
    3. Line dish with sheet of puff pastry, cutting off excess.
    4. Mash sweet potato, and mix with cheese, nutmeg, parmesan and salt and pepper.
    5. Mix in eggs, then pour onto puff pastry.
    6. Bake in oven for 30-40 minutes.
    7. Serve with salad.

    Sunday, 18 July 2010

    Pascualina - Spinach Pie


    Pascualina is a spinach pie which we often eat in Uruguay. It is made with spinach or silver beet, sauteed onions and a home made pastry. I cheated because I love puff pastry, so I used a bought one. I have found the puff pastry from Aldi to be the best out there. I have tried many brands and the Aldi brand really kicks the backside of any of the more well known puff pastries out there. Well that's my opinion anyway.

    I also use the Aldi frozen spinach. The reason I like it is because it is really easy to defrost as it comes in 6 pieces, and it is dry. Whenever I have defrosted other brands of spinach, I find that there is a huge amount of water, so you can never just add it to the dish frozen because you need to drain it first. The spinach from Aldi, doesn't have to be drained. It's perfect :)

    Ingredients
    3 onions chopped finely
    1kg frozen spinach (defrosted)
    1/2 nutmeg freshly grated
    250gms Philadelphia cream cheese
    6 eggs
    4 sheets frozen puff pastry
    Olive oil
    salt and pepper to taste
    Egg wash

    1. Pre-heat oven to 190 degrees celcius.
    2. Sautee onions until golden.
    3. Add spinach, cream cheese, nutmeg and salt and pepper to taste. Stir through until all ingredients are mixed together. Put aside to cool slightly.
    4. Line a rectangular tray with puff pastry ensuring the pastry reaches right up to the edge of the tray.
    5. Spread out the filling over the puff pastry, and with a spoon make 6 holes in the filling so you can pour in the whole eggs. Crack eggs one by one and pour into the holes.
    6. Cover the pie with more pastry sealing the edges.
    7. Brush pastry all over with egg wash and bake in a hot oven for 40 minutes until pastry is golden.
    8. Serve with roasted sweet potato and steamed green beans.
    Serves 6-8

    Thursday, 20 May 2010

    Croquetas


    150gms arborio rice
    300gms cold water
    1/2 a vegetable stock cube
    20gms fresh chopped parsley
    20gms grated parmesan
    1 small onion finely chopped
    140gms rice milk
    10gms pure cornflour
    1/2 cup gluten free savoury biscuits (processed to a fine crumb)

    1. Place rice, stock cube and water in a microwave proof bowl.
    2. Set on high for 10 minutes. Stop after 8 minutes and stir thoroughly.
    3. Finish cooking and set aside.
    4. Saute onion in a non stick pan until caramelised, turn off heat and add parsley, stir to wilt parsley.
    5. Add rice, combine and set aside.
    6. In a microwave safe bowl, place milk, cornflour and cheese. Cook on high for one minute, take out and stir. Cook for a further minute. At this time the sauce should be thick.
    7. Pour sauce over the rice mix and combine. Set aside to cool.
    8. Form rice mix into balls and roll in crumbs.
    9. Deep fry until golden brown and serve with salad.

    Wednesday, 21 April 2010

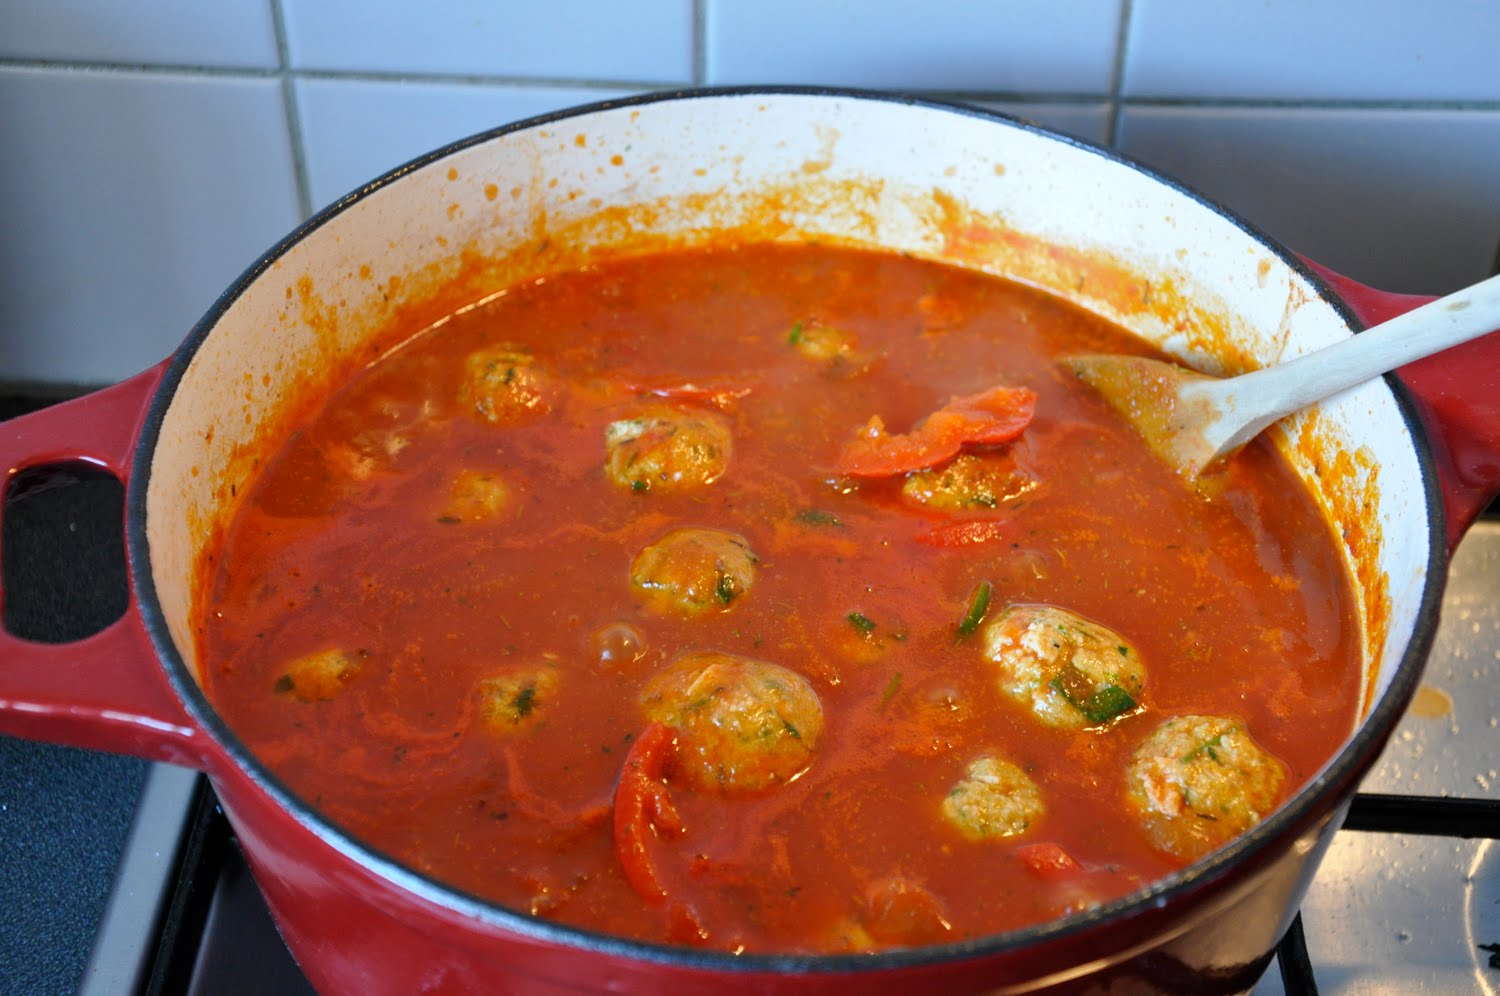
    Albรณndigas Vegetarianas - Vegetarian "Meatballs"

    I was watching MasterChef yesterday and thinking that there aren't many vegetarian dishes on the show. I was contemplating how I would survive on a show such as that one, and realised that I probably couldn't survive on it very long.

    There was one vegetarian girl on the show last year and she was quickly outed. From what I've seen there are no vegetarians on the show at all this year.

    Anyway so I got to thinking about vegetarian cooking in general and all these ingredients came into mind and I decided to make these.

    Ingredients (Serves 4-6)
    500gms firm tofu (I used Pureland Organic Tofu)
    1 small bunch of chives
    1/4 cup chopped parsley
    100gms fresh shitake mushrooms
    3 tablespoons of potato flour
    1 clove of garlic (minced)
    1 egg
    salt to taste
    Olive Oil

    For the sauce
    1 750ml Provista Sugo Classica
    2 medium onions sliced
    4 baby red capsicums sliced
    1 tbs dried thyme
    1 medium green chili sliced
    3 bay leaves
    2 cups of water
    salt to taste
    Parmesan cheese to serve.

    To make the albondigas
    1. Saute mushrooms in olive oil, then set aside to cool.
    2. Chop half of the tofu and set aside. Put the other half in the food processor.
    3. Add chopped chives, garlic, parsley, egg, flour and salt. Process to a paste.
    4. Add mushrooms and process, make sure that mushrooms are still in pieces.
    5. Add chopped tofu and process, leaving chunks of tofu.
    6. Form into balls and set aside.

    To make the sauce

    1. Saute onion and capsicums in a heavy pan until collapsed.
    2. Add sugo and water and simmer for 5 minutes.
    3. Add salt to taste, chopped chili, bay leaves and thyme.
    4. Slowly and carefully add the albondigas into the sauce (do no stir).
    5. Simmer covered for 20 minutes, serve with brown rice and sprinkle with chopped parsley or Parmesan cheese.


    Friday, 2 April 2010

    Alfajores de Maizena (Gluten Free)


    Alfajores de Maizena are small soft shortbread type cookies which are joined together with "dulce de leche" (thick caramel). Their sides are covered in dessicated coconut.
    These are a favourite snack in Uruguay, Argentina & Chile. Some of the ones you can buy ready made, are covered in chocolate. The ones made in Chile have a much harder cookie, but are still assembled the same way.
    Maizena is cornflour, and the main ingredient in this recipe.

    I just love these!!
    I saw some at my mum's yesterday but because of their wheat content I was not able to eat them. They have a small amount of wheat flour in them.
    So I went shopping and bought 100% corn cornflour, I found a recipe which I converted into gluten free by replacing the wheat flour with rice flour and potato flour. I also replaced the cognac and lemon rind.
    Now I can eat these to my heat's content (although in reality my heart would be much happier if I were eating broccoli instead!!)

    Ingredients
    200gms low salt margarine (you can use softened unsalted butter)
    150gms caster sugar (superfine sugar)
    3 egg yolks
    300gms pure cornflour
    125gms rice flour
    75gms potato flour
    2tsp gluten free baking powder
    1tsp vanilla extract
    1tsp lemon extract

    To assemble
    200gms dulce de leche (Nestle Top'n'Fill works really well)
    80gms dessicated coconut

    METHOD
    1. Preheat oven to 165 degrees celcius (fan forced)
    2. Sift flours and baking powder together, set aside.
    3. Cream margarine, sugar, extracts and yolks with an electric mixer until light and fluffy.
    4. Fold in dry ingredients until it all comes together.
    5. Place dough on a large piece of baking paper, and knead lightly.
    6. Roll dough out to about 1/2 a cm between two pieces of baking paper.
    7. Remove top sheet of baking paper, and cut with a round cutter.
    8. Place on a cookie sheet at least 2 cms apart from eachother, and bake for 15 minutes.
    9. Allow to cool on a cooling rack.
    10. Place enough caramel on the bottom of a cookie to cover it, and gently press another cookie to it so that some caramel comes out of the sides.
    11. Spread the squeezed out caramel all over the sides of the cookies, and then roll that part through the dessicated coconut.
    12. Eat accompanied with a cup of tea or coffee. YUM!!!

    Sunday, 28 February 2010

    Coconut Creme Caramel

    As I mentioned in my previous posting, I'm experimenting with recipes. Hubby doesn't deal well with dairy products, so this one was "kinda" done for him.


    I say "kinda" cause it was also done for me ;) hahahaha


    Who wouldn't love creme caramel made with coconut milk. Well I suppose all those people that just plain don' t like cream caramel and those that detest coconut. HEATHENS!!!!


    2 x 400ml cans of coconut milk

    6 large eggs

    100gms caster sugar (superfine sugar)

    2 tsp vanilla extract (I used homemade)

    1 tsp lemon extract (I used homemade)


    Caramel
    200gms caster sugar

    20gms water

    Monday, 15 February 2010

    Coconut Chocolate Mousse Cake

    In the last couple of years, to my dismay and disappointment, I have discovered that wheat is not my friend. I tried to fight it, but I lost.

    I have bought a few books on gluten free cooking, as I just love to cook but haven't tried many recipes yet. Wheat based products, cakes, breads, pastas, are just my absolute favourite. Isn't life just cruel??

    Anyway I have decided to start experimenting a little more with gluten free cooking.

    I am also vegetarian, which makes it even more difficult as a lot of gluten free recipes use gelatine. :(

    Anyway here is my first experiment.

    Cake base is a modified version of this cake found here. I changed the flour to make it gluten free and modified the process slightly.

    http://jeenaskitchen.blogspot.com/2007/08/coconut-sponge-cake-fat-free.html

    Cake Base
    Ingredients
    100gms Plain Gluten Free Flour
    4 eggs
    50gms white sugar
    60 gms brown sugar
    60gms dessicated coconut
    2tsp vanilla extract
    1/4 tsp bicarb of soda
    1/2 tsp cream of tartar


    Method

    1. Preheat oven to 180 degrees Celsius.
    2. Sift coconut, flour, soda and tartar and set aside.
    3. Place sugars, vanilla and eggs in a bowl and mix with an electric mixer for 5 minutes until the mixture is doubled and is light and fluffy.
    4. Fold in the dry ingredients and pour batter into a greased 9 inch removable base tin.
    5. Bake for 40 minutes or until an inserted skewer comes out clean.
    6. Allow to cool in the pan.


    Chocolate Mousse
    I used this recipe from Jill Harris (Vegan Chocolate Mousse)

    Ingredients
    510gms silken tofu
    420gms dark chocolate (I used 70% Lindt)
    100gms maple syrup

    Method

    1. Blend tofu in a food processor until it is very smooth.
    2. Chop chocolate into small pieces and melt in the microwave in 30 second bursts, being careful not to burn it.
    3. Once chocolate is fully melted add syrup and mix thoroughly.
    4. Add chocolate mix to the tofu in the processor and blend until thoroughly mixed and very smooth.
    Raspberry Topping
    Ingredients
    300gms raspberry puree
    80gms sugar
    20gms potato flour
    40gms water


    Method

    1. Mix potato flour with the water, and add it to a pan with the raspberry puree and sugar.
    2. Cook on slow heat until mixture thickens.
    3. Set aside to cool
    Assembling Cake


    Cut cake in half. Place one layer of cake on the base of a pan, and pour mousse over it. Smooth mousse and place left over layer of cake. Press it down to make sure it sticks together.
    Pour raspberry sauce over the top, smooth over and place in the fridge.
    Allow it to set overnight.

    NOTES: This cake was fully consumed at work the following day. There was mixed feedback. Generally it was good, but the mousse was very rich and firm. I loved the mousse, but indeed it was very rich, i think an extra 100 gms of tofu wouldn't go astray. I also think that making it with milk chocolate instead of the 70% I used would make it a lot less rich.


    I personally loved the raspberry topping, as I thought it really cut through the richness of the mousse. Some of the taste testers commented that they preferred to have the mousse with the cake on the base, and the topping with the cake on the top. Each to their own I say :)

    Next experiment should be a white chocolate mousse cake :) YUMMY YUMMY!!!

    Monday, 12 October 2009

    Pear and Maple Syrup Triangles

    This super easy dessert can be made with homemade puff pastry or ready made pastry from the supermarket. If you're in Australia, the brands of puff pastry that I recommend are, first "Pastry Chef" from Aldi, and second the "Black & Gold" brand from IGA. I find that these brands are so much flakier and light than any other brand. The IGA "Black & Gold" had been my favorite for years until I recently discovered the brand from Aldi.

    Ingredients

    1.5 ready made puff pastry sheets
    1 large pear
    1 tablespoon of pure maple syrup
    6 large strawberries, washed
    6 tablespoons of creamy vanilla yogurt
    1. Peel the pear, cut it into fours and remove the core. Slice very thinly.
    2. Place the pear in a small bowl and pour the maple syrup over it, mix well and set aside.
    3. Cut the whole sheet of puff pastry into four squares, and the half into two.
    4. Remove the pear from the syrup and divide into 6.
    5. Place filling in the center of each square and fold in half, pressing the edges with a fork to seal.
    6. Place on a cookie tray lined with baking paper, and brush any remaining maple syrup (from the bowl) over the triangles.
    7. Bake till they are nicely colored.
    8. Serve drizzled with a tablespoon of vanilla yogurt and decorate with a sliced strawberry.
    Serves 6

    Sunday, 11 October 2009

    Roasted Veggie Bake with Lettuce, Apple & Walnut Salad

    Veggie Bake (serves 6)
    1 large eggplant
    1 large zucchini
    400gms Jap pumpkin

    1 large onion chopped finely
    3 cloves of garlic
    3 tablespoons of fresh thyme (finely chopped)
    2 tbs vegetable oil
    800gm of canned tomatoes (blended)

    500gms firm tofu (or 500gms low fat ricotta)
    3 tablespoons dry chives
    salt & pepper to taste

    50gms baby spinach leaves

    1. Slice the eggplant, zucchini and pumpkin very finely, spread out each vegetable on a baking tray lined with baking paper (to prevent sticking) and brush lightly with olive oil (or spray with cooking spray. Cook on a hot oven until they are tender. Set aside
    2. Chop onion and garlic finely and saute in the olive oil some vegetable oil. When they are see through and starting to caramelise, add the can of tomatoes and simmer for 10 minutes, add thyme and salt and pepper to taste, and simmer for another 5 minutes. Set aside.
    3. Place tofu, dry chives and salt & pepper into a food process, and blend until it resembles a cream cheese. (if using Ricotta, just blend until the chives are mixed through the cheese)
    4. Spoon some of the cooked sauce on the bottom of a baking tray and layer with eggplant, followed by some zucchini. Place the whole lot of tofu (or ricotta) on top of the zucchini, flatten it out, and then continue to layer that with pumpkin, followed by spinach leaves. Spoon more sauce on top of the spinach leaves, then place the remainder of the eggplant, and finish off with some more sauce.
    5. Bake in the oven for 25 minutes.
    6. Serve with salad
    Salad
    3/4 of a butter lettuce
    50gms spinach
    1 fuji apple
    1/4 cup chopped walnuts
    1 carrot
    Dressing
    1 tablespoon dijonnaise
    1 tablespoon balsamic vinegar
    1 tablespoon sesame oil
    1 tsp brown sugar

    1. Tear the lettuce roughly and place in a bowl with the washed spinach.
    2. Peel the carrot and cut into thin batons.
    3. Peel apple, remove core, and cut into quarters. Slice each quarter into small pieces.
    4. Mix dressing, and pour over the lettuce. Mix in other vegetables and walnuts.
    5. Serve immediately.

    Sunday, 4 October 2009

    Breakfast Stack

    A few weeks ago hubby and I delivered a wedding cake in the morning to a venue near the city. Afterward we went to the Veggie Bar for brunch. One of the things Boone had was a breakfast stack. It looked simple enough, so I decided to try it out. So here it is. It was delicious. The hash browns I made were a little thick according to hubby, the ones at Veggie Bar were the type they use at McDonald's, and mine were homemade. I think if they were thinner they'd be crunchier, but I liked them like this.

    Breakfast Stack (Serves 3)
    Hash Browns (recipe below)
    Mock Hollandaise (recipe below)
    3 free range eggs (poached)
    1 large tomato (cut into thick slices)
    3 large flat mushrooms (stalk removed)
    120gms Baby Spinach Leaves
    Vegetable oil to cook
    1. Make hash browns and hollandaise as per recipe below and set aside.
    2. Cook mushrooms on a little bit of vegetable oil, these take a while to cook so I'd suggest cooking them first and setting them aside while you prepare the other ingredients (keep warm)
    3. Poach your eggs.
    4. Cook tomato on a non stick pan and a little vegetable oil
    5. Sautee spinach leaves
    6. Assemble by putting the hash brown on the bottom, follow with the tomato, then the mushroom, spinach and then the egg. Pour some of the sauce over the top. Serve warm

    Hash Brown
    420gms (15oz) Potato (cut into small squares)
    40gms (1oz) Potato Flour
    Salt & Pepper to taste
    Vegetable/Olive oil for frying
    1. Cook the chopped potatoes and set aside to cool. I put mine in the microwave for 10 minutes and they were done. I left the skins on because they were very clean and the extra nutrition never goes astray ;)
    2. Add the potato flour and mix it through thoroughly through the potatoes. Press the mix into an egg mold on a chopping board. Move the mold to ensure it is not stuck on the bottom and unmold. The hash brown should come out intact. I used larger molds, used for crumpets. This mix made 3 hash browns in the larger mold.
    3. Cook on a non stick pan with a little vegetable or olive oil until they are nicely colored and crunchy.
    Mock Hollandaise
    10gms Arrowroot
    15gms Potato Flour
    1 egg yolk (optional)
    2tsp lemon juice
    3/4 cup rice milk (soy or dairy is ok too)
    1/4 tsp tumeric
    Salt & Pepper to taste
    1. Mix all ingredients in a saucepan until thoroughly mix.
    2. Cook on a low heat until sauce thickens. Add water if the sauce is too thick.
    3. Season with salt and pepper.
    4. Pour over stack.

    Sunday, 26 July 2009

    Three Cheese Pasta & Spinach Bake


    Ingredients
    450gms cooked pasta (tubes or spirals are great for this, I used gluten free pasta, for a gluten free dish)
    350gms ricotta
    120gms grated Tasty cheese
    85gms grated Parmesan cheese
    250gm packet of finely chopped spinach (defrosted and drained, ends up being about 120gms of spinach)
    6 large eggs (lightly beaten)
    salt and pepper to taste

    Method
    1. Pre-heat oven to 200 degrees Celsius.
    2. Place pasta, cheeses, spinach, salt, pepper and eggs in a large bowl, and mix thoroughly ensuring that the pasta does not break up too much.
    3. Grease a deep non stick pan and pour mixture into the pan.
    4. Bake for 40 minutes.
    Bean, Potato & Caramelised Onion Salad
    Ingredients

    260gms boiled potato cubes
    190gms cooked flat beans
    2 large onions sliced
    1/4 red capsicum
    1/2 yellow capsicum
    1/2 cup balsamic vinegar
    2 tbs sugar

    Method
    1. Place balsamic vinegar in a small pot with the sugar. Bring to the boil, and then lower to a simmer. Simmer for 5-10 minutes. Allow to cool. It will have a syrupy consistency.
    2. Cook beans in boiling water, I like mine to be a little crunchy. Set aside.
    3. Heat oil in a fry pan and cook onions until they are caramelised. Set aside.
    4. Grill capsicums and remove skin, slice thinly and set aside.
    5. Place all ingredients in a bowl and toss together. Serve with vinegar reduction.

    Sunday, 19 July 2009

    Pasta Frola con Dulce De Batata - Sweet Potato Tart

    Pasta Frola is a tart made traditionally with quince jam. It is very common in Uruguay and Argentina. In Uruguay we also have bastardised this tart and make it with other types of jams.

    We have many so called jams in Uruguay, which are so different to what is regarded as a jam in Australia. We have milk jam, tomato jam, sweet potato jam, quince jam, pumpkin jam.

    Milk jam is basically a thick rich caramel which we use for many of our desserts. It is a staple in our celebration cakes which normally consist of a sponge or butter cake filled with dulce de leche (milk jam) , Chantilly cream, and sometimes pieces of peach. Mostly these cakes are covered in a beautiful cooked soft meringue.

    We eat dulce de leche on bread or on our lovely "tortas fritas" (which I will blog about another time). It is delicious on creme caramel and we also use it to fill these tarts. YUMMY. But I digress, today is not about Dulce de leche.

    The texture and consistency of the quince, sweet potato and pumpkin jams is very similar. They are more like thick pastes which can be cut into slices, and eaten on bread or with cheese. They are all very different in flavour but all so delicious. All of these can be used as a filling for this tart. The traditional filling for a "Pasta Frola" as previously mentioned is the quince jam or "Dulce de Membrillo".

    Yesterday my mum gave me a tin of "Dulce de Batata", or sweet potato jam. I love it!! I guess it must be an acquired taste, neither mum or dad are big fans of it, but they will eat it if they must.

    Today we had lunch at mum and dad's. Mum made stuffed capsicums and a pasta sauce. I brought home made egg fettuccine and a Pasta Frola which I made with the sweet potato jam.

    The recipe for the Pasta Frola that I used is an old family recipe that we have had for over 30 years, and possibly my mum has had since before I was born. It came from a little booklet which came with our "Royal" which is the brand of Uruguayan baking powder.
    Anyway here is the recipe for the tart

    Pasta Frola
    125gms softened butter
    100gms white sugar
    1 egg
    1 egg yolk
    240gms plain flour
    2tsp baking powder
    1tsp grated lemon rind
    1/4 tsp salt
    Filling
    300gms Quince Jam (please note that I did not use quince, i used sweet potato)
    2 Tbs water(for softening the jam)

    1. Preheat oven to 180 degrees Celsius.
    2. Cream butter and sugar.
    3. Add egg & yolk one at a time beating well after each addition.
    4. Mix in lemon rind
    5. Add flour, baking powder and salt (sifted together) to the first mix, forming a soft dough. Do not over knead or the dough will become tough.
    6. Roll out 2/3 of the dough and place it in a 23cm tart pan.
    7. Spread the filling over the dough and use the remaining pastry to decorate the top of the tart by cutting out strips of dough and placing it in a lattice pattern on top.
    8. Bake at 180 for 30 minutes.
    I sometimes make the recipe with margarine instead of butter, I did so today. For the filling as I specified before I used the sweet potato, I just used a whole tin like the ones pictured above, and placed the contents into the food processor. This made it really easy to get a really smooth filling.

    This dough is also lovely to make cookies with, and it's also the same recipe I used for these Lime Meringue Tarts which are gluten free

    It is very easy to convert this recipe to gluten free, you just swap the flour and baking powder for Orgran Gluten Free Self Raising Flour.
    The recipe for the lime curd is here http://www.bestrecipes.com.au/recipe/Lime-Curd-L2437.html